Performing and checking your own steps
Our users typically progress through three stages of using the software. In the first stage, solve buttons are almost exclusively used to generate the solutions. After this observational stage, most students are tempted to direct the software to perform steps by selecting specific transformations available under the Transformation menu. Finally, most advanced users will want to simply enter their own steps, and use the software only to check for correctness – this is what the  button is for.
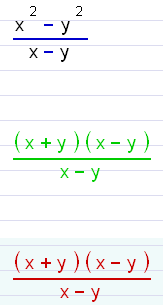
After you have entered an expression, for example :

Click on the "Check your work" button.
That will create another copy of the expression (for you to manipulate).

This expression is drawn in red to indicate that it still hasn't been checked by the software.
You can now edit the expression any way you like – for example, factoring the numerator would be an appropriate manipulation:

After clicking the "Check your work" button again, the software will perform the check and inform you of the result. In this case, it will make the current expression green (because the manipulation was correct), and create another ‘red’ copy for you to manipulate.

In case your manipulation is not correct, the system will ask you to retry it.
When the final (correct) solution is reached, an appropriate message will appear and no more red expressions will be generated.
![]() Do not confuse the
Do not confuse the  button with the
  button. The former is used as described above, while the latter is used to explicitly check the validity of a solution to an equation or inequality.